Food list, food management & catering
Last updated:
Fast and efficient food management on set
Dramatify helps you create automatic food lists for your caterer, track who eats what, and manage meal costs and taxes. You’ll get complete overviews of meals to be served, individual preferences, allergies, plate counts, meal times, and ready-made payroll exports.
Step 1: Set meal preferences in production settings
On the Project page, click Settings in the orange toolbar, then click the Meal settings bar.
- Whether your production offers meals
- Which meals are typically provided
- How meal costs for crew and cast should be charged
- If you do not offer meals, tick the box at the bottom of the meal preference panel.
All choices are automatically reflected in the .csv export, so payroll can see whether meals are free, deducted, or taxed.
Step 2: Add individual meal cost settings (optional)
If some team members have different contractual meal terms, you can override the default settings.
Crew
- Go to Crew > select person > Edit (hover in the right-hand corner).
- Scroll down and click Project settings.
At the end of the section, under Meals, set the individual settings for this crew member, adjusting meal cost handling per meal or indicate that an individual receives no meals. Note that the available settings reflects your choices in the main settings described above.
Cast
- Go to Cast & Characters and click the name of the cast member.
- In the pop-up, click Edit member details.
- Scroll down and click Project settings.
At the end of the section, under Meals, set the individual settings for this crew member, adjusting meal cost handling per meal or indicate that an individual receives no meals. Note that the available settings reflects your choices in the main settings described above.
Step 3: Add personal food preferences and allergies (optional)
Meal preferences and allergies can be set in two ways:
Before inviting a team member
You can add meal preferences and allergies before inviting a team member.
Crew: Follow the first point in Step 2 above, then scroll down to Profile & Contact information. Add the relevant information in the Food & Allergies section. Remember to save!
Cast: Follow the two first points in Step 2 above, then scroll down to Profile & Contact information. Add the relevant information in the Food & Allergies section. Remember to save!
After inviting a team member
All cast and crew can add and update their preferences and allergies in their personal profiles by;
- Clicking their own name in the top navigation and selecting Profile/Settings.
- Click Edit in the upper-right corner of the white window.
- Scroll down to Protected information and click Food & allergies.
- Fill out the information in the form and remember to save!
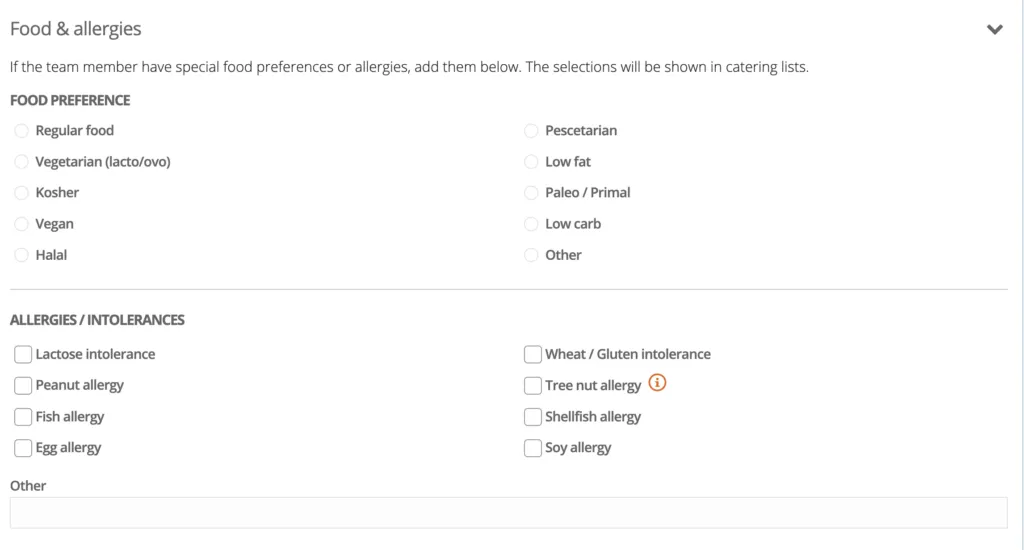
Step 4: Schedule meals for cast and crew
Make sure the correct people receive meals on the right days:
Crew
- In Planning > Crew > Booking, check the crew members scheduled to work on each specific day.
- They will automatically appear in the food list unless marked as “No meals” in their individual settings.
Cast
- Cast members need a call time in the Daily Cast schedule (Cast & Characters > Daily) to receive meals.
- This includes both shooting and non-shooting days.
- Individual exceptions can be set in their production settings as in Step 2.
Step 5: Add snacks and extra meals
Under On set > Meals, you’ll see the automatically compiled list of cast and crew meals, and their meal requirements and allergy information.
Use the buttons next to the individual meals above the list to add snacks and extra meals: These are free-text entries, and you can add as many as needed.
Step 6: View the complete food list/catering orders
Go to On set > Meals to see the complete compiled list, including:
- All scheduled cast and crew meals
- Individual meal and food settings
- All extra meals and snacks added
Step 7: Count plates and record meal breaks
In On set > Check in/out, select the meal you want to record. You can:
1. Record who ate / plate count
- Click Now to time-stamp that the individual is eating a meal.
- If you also need to check someone out from working hours, the same button records that too, or you can enter custom times.
2. Record break times (optional)
- When the break ends, click Now again (or enter a custom time).
- One click records just a meal; two clicks record both the meal and the break duration.
Step 8: Export meal costs and break times
Go to On set > toolbar menu > Export to download a .csv file with:
- All working hours
- All break times
- All meals
- How meal costs should be handled per person and per meal
Bon appétit!
Was this article helpful?
Thanks for your feedback!